How to Make Faux Brick Panels Look Like Real Brick
If you know me, or if you have been here before, you know I love a good DIY project. Especially if it has anything to do with paint and getting my hands dirty. Now, don’t be afraid, this project today is now scary, in fact, it is one of the easiest and more fun projects I have done in a long time. I want to show you how to take those ugly faux brick panels from Lowes or the Home Depot and make them look like real, warn, well loved brick with only a few inexpensive items.
I think we can all agree that brick is a timeless material that just looks good in any area. Its a wonderful material to use and my gosh I dream about tearing out a wall in a home and finding an old brick wall. But, with my home that’s not possible since we built it ourselves.
These days there are so many options on how to get the real brick look for less, including wall paper, brick veneer tiles, and more. Today I want to talk about how I took a faux brick panel from The Home Depot, added it to the hearth of the fireplace in my bedroom, and gave it a real brick look in just a few hours with only a few inexpensive tools.
If brick is something you want to add to your home, the faux brick panels are really a great way to go. They cut easily on a miter saw, since they were made of Masonite board. They also have that brick texture to them, so they don’t appear as fake as maybe the wallpaper would.
About 2 years ago, we remodeled our master bedroom and the one thing I wanted to include in my bedroom was a fireplace! We have a wood burning fireplace on our main level, and a pellet stove in our upstairs family room…but there was something about having one in my bedroom that was irresistible.
So, what they meant was that we needed to build a fireplace in our bedroom. On the second floor. With no real way to have a real fireplace in our bedroom, we had to build a faux fireplace.
When we originally built our fireplace, I decided to just throw up some shiplap inside the insert of the fireplace just to make it look cute, but I wasn’t quite sure what I wanted. Over the past year or so, I have wanted to change things up and decided that I wanted to add a brick insert to the fireplace.
Now, let me explain that this is not a functional fireplace. We built a faux fireplace set up so that it could house a freestanding electric stove that looked like it was an old potbelly stove look.
So, material was not necessarily an issue because there was not any heat being radiated onto the inside of the fireplace. Even at that , we thought a faux brick would be the best idea, so I had my husband grab me one of those faux brick panels on his way home from work one day and we were easily able to cut the faux brick and get it inserted into the hearth of the fireplace.
But once we installed the brick, we realized how “fake” it looked. I really needed to do something to fix this issue.
So, let’s talk about what we used to take this faux brick panel and turned it into stylish real brick in under an hour!
- large rectangular sponge
- assorted paint colors ( I will list the ones I used here)
- Folk Art Concrete Finish
- Tray or something that you can use to mix paint and big enough to use a sponge the size of the individual bricks( I use an old baking pan, which I covered in tin foil to protect it and allow me enough space to mix up my paints and use what I need.
Here are the paint colors I used on my faux brick panel:
- FolkArt Milk Paint in Brass Buckle
-
FolkArt Pickling Wash in Assorted Colors (2 oz), 5824 Driftwood
-
Martha Stewart Crafts Home Decor Eggshell Paint: Sand Dollar
- In addition to these I mixed up some paints to create some grays/rusts browns/and even a touch of yellow.
You can see all my paints and the full tutorial of how I covered these faux brick panels here:
So, let’s talk about what I did to create a real brick effect with faux brick panels.

The first thing you want to do is to cut your sponge in half that will fit the brick squares.
I lined a cookie sheet with tin foil and poured a little bit of each of the paint colors that I used.

Once you have all the colors on the sheet, you will want to dab the sponge in some of the colors, making sure to get an assortment of the colors. If you have looked at brick before, you will know that there is usually a bit of color variations. Its also important to consider what you want the brick to look like. I wanted mine to be slightly washed out, and I wanted to dull the bright orangey red color of the store bought faux brick.

Start dabbing the paint onto the faux brick in a random order. Rotate the sponge, and try to smudge the paint a bit as well. You don’t want to see a consistent pattern on the bricks.
They key to creating realistic brick is to work in layers.
They first little while, you will be thinking “what in the world am I doing?” It will not look that good…but like with many other paint projects, it takes time. Keep going. Keep slowly adding a little bit of paint at a time. You are essentially going to use a fry brush technique, but with a sponge.
If you watch my full tutorial video above, you will see the method that I use to give it an organic look.

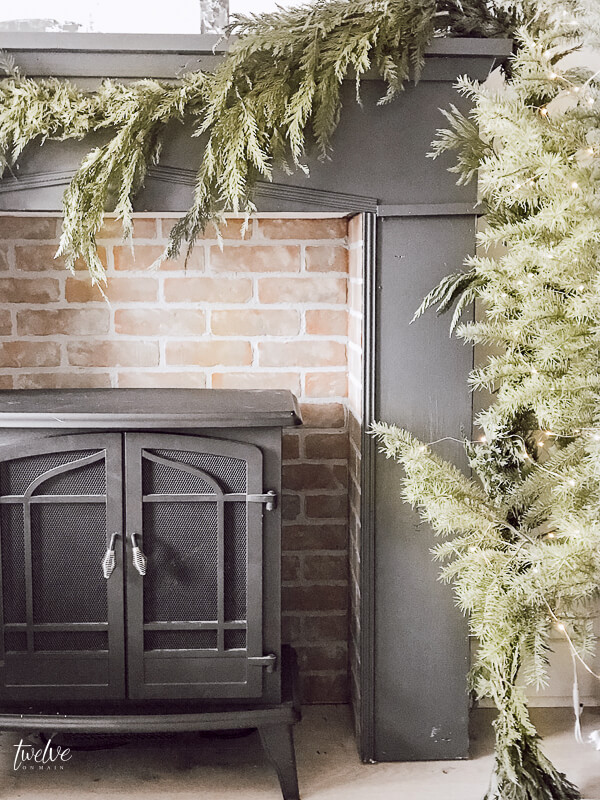
Here is an image of our fireplace with the faux brick panels at Christmastime. I think that they look really great! They still had a bit of the red hue coming through but they are not bright red/fake red. I love the combinations of colors that textures that give the bricks dimension as well.
A few months after painting these bricks, I decided to add a bit more paint to them and give them more of a gray wash. I wanted them to look more like antique gray bricks.
I easily did this by using the Folkart Pickling wash in Driftwood. This one was really great. It added a more muted appearance to the bricks. It was also still transparent enough to allow the other colors to come through a bit.
Here is what it looks like now after all the changes I have done to the fireplace.

It looks a bit more washed out in these pictures but there still is color pulling through.
You can see it a little better in this image. I wanted the bricks to fade into the back just a bit. But I also wanted to add character and charm to the room.


The great thing about being able to paint the faux brick panels is that if I tire of this look, I can add more of the colors back into it. I can add more white paint and whitewash the brick or even paint it black! There are so many great ways to change up a store bought brick panel.
Want to see more of my painting DIY projects, check these posts out here:
Painting and Distressing Furniture 101- Bringing Farmhouse Style Home
Make a Fixer Upper Style Vintage Green Chalkboard
How to Distress Furniture Like A Pro!
Painted Furniture Makeover Tips and Tricks You Need to Know
The Best and Easiest DIY Faux Wood Beams to Make Yourself
Make Chalkboard Paint In Any Color You Want!
What do you think of the faux brick panels. Are you a fan? Have you used them in your home? I would love to hear!
Leave a comment and make sure to share this post on Pinterest or Facebook. This is how we promote our projects in hopes that more people will find them!
Have a great day friends!
xx


We bought 3 sheets of faux brick panels from Home Depot and attached them to an accent wall in my son’s room. We then used a ton of spackle and did a German Schmear over it allowing the brick to peek out in certain areas. It turned out amazing!
I was also looking for this brick look. I could not find anything that I really liked so I made my own bricks – thin and papercrete. I love them and have mounted them in our office. They turned out exactly as I had envisioned.
Wow how cool!!
You’ve got me thinking abut where I could use brick panels in my own home- thanks for the inspiration!
You are welcome!
What a clever fireplace – that brick made it seem so real – no one would ever know it is not functional – neat idea. Well done.
I have lived in this house for 18 years and have always wanted to brick up a feature wall in the upstairs den with those thin brick panels. We don’t do the DIY thing – but you have inspired me to ask around again and get someone to do it for us. It’s time, I’m getting any younger! Do now before we downsize, right? LOL. Thanks for the inspiration!!
Absolutely beautiful. Now did you put the faux brick panel from Home Depot behind the fireplace is that what I’m reading? I didn’t think it was safe behind there. If so how is it holding up?
Yes I did and it has been just fine. The back of our fireplace heater does not get hot at all. We keep an eye on it, and I would definitely follow the manufactures instructions on yours.